페이스북 시계열 분석 라이브러리 : Prophet 🐥
* 시계열 예측을 그래프(시각화)로 표현하는 모델
* Prophet 모델에 넣어줘야 하는 데이터 형태
- index는 날짜, Date컬럼, Adj Close(수정종가) 컬럼
- Prophet에서 사용하는 컬럼명은 ds, y 컬럼명을 사용함
→ 기존 컬럼명을 수정해야함
→ Date 컬럼명은 ds로, Adj Close 컬럼명은 y로 수정
가상환경 생성 - Prophet 🐥
<Prophet 가상환경 생성 및 라이브러리 설치하기>
* 가상환경 생성은 Base에서 명령 실행
* 가상환경 생성 후에는 생성된 가상환경 이름으로 활성화(activate)
* 라이브러리 설치는 생성한 가상환경 안에서 모두 설치 진행...
1. 가상환경 신규 생성하기
→ Prophet은 파이썬 3.9 이하 버전에서만 작동함(3.9 안됨)
>conda create -n gj_env_prophet python=3.6
2. 생성한 가상환경으로 활성화하기
>conda activate gj_env_prophet
3. C++ 라이브러리 설치(제일 먼저 설치해야함)
- Prophet은 C++로 만들어진 라이브러리
>conda install libpython m2w64-toolchain -c msys2
4. 라이브러리 설치하기
- 날짜변환 라이브러리
>pip install convertdate
>pip install convertdate
>pip install lunarcalendar
>pip install holidays
>pip install cython
>pip install wheel
>pip install pystan
>pip install ipython jupyter matplotlib pandas xlrd seaborn scikit-learn
>pip install openpyxl
>pip install fbprophet
>pip install plotly
>pip install jupyter notebook
>pip install yfinance
>pip install statsmodels
>pip install pmdarima
>pip install exchange_calendars
5. 커널 생성하기
>python -m ipykernel install --user --name gj_env_prophet --display-name gj_env_prophet_kernel
6. 가상환경, 커널 생성 확인하기
>conda env list
>jupyter kernelspec list
가상환경 gj_env_prophet에서 jupyter notebook 실행
gj_env_prophet_kernel로 커널 바꾼후 run all
원본데이터에서 - Date index는 컬럼 데이터로 변환 🐥
- 훈련에 사용할 컬럼명 : Date, Adj Close
- 훈련에 사용하지 않는 컬럼은 삭제
- 훈련에 사용할 컬럼명 변경 : Date → ds, Adj Close → y
- 최종 데이터프레임 변수명 : prophet_data
원본데이터에서 - Date index는 컬럼 데이터로 변환
prophet_data = goog_data.copy()
prophet_data
### 강사님
# - Date index는 컬럼 데이터로 변환
prophet_data.reset_index(inplace=True)
# - 훈련에 사용할 컬럼명 : Date, Adj Close
# - 훈련에 사용하지 않는 컬럼은 삭제
prophet_data.drop(["Open", "High", "Low", "Close", "Volume"], axis=1, inplace=True)
# - 훈련에 사용할 컬럼명 변경 : Date → ds, Adj Close → y
prophet_data.columns = ["ds", "y"]
prophet_data
Prophet 라이브러리 설치🐥
- 가상환경 새로 만들어서 진행 : 버전 충돌이 많이 일어남
- 가상환경 생성 시 python 버전은 3.6 버전 사용
(3.9 버전은 사용이 안되기에, 3.9 이하 버전으로 사용)
- Prophet 라이브러리는 C++ 프로그램으로 만들어져 있음
from fbprophet import Prophet
일 단위 주기성 활성화하기
### prophet 모델 생성
model = Prophet(daily_seasonality=True)
model
<fbprophet.forecaster.Prophet at 0x1d53797cda0>
모델 학습 시키기
model.fit(prophet_data[["ds","y"]].iloc[:-10])
<fbprophet.forecaster.Prophet at 0x1d53797cda0>
3년후 예측하기
기존 값에 3년 후 일자를 포함해서 추출하기
future = model.make_future_dataframe(periods=365*3)
future

예측하기
forecast = model.predict(future)
forecast

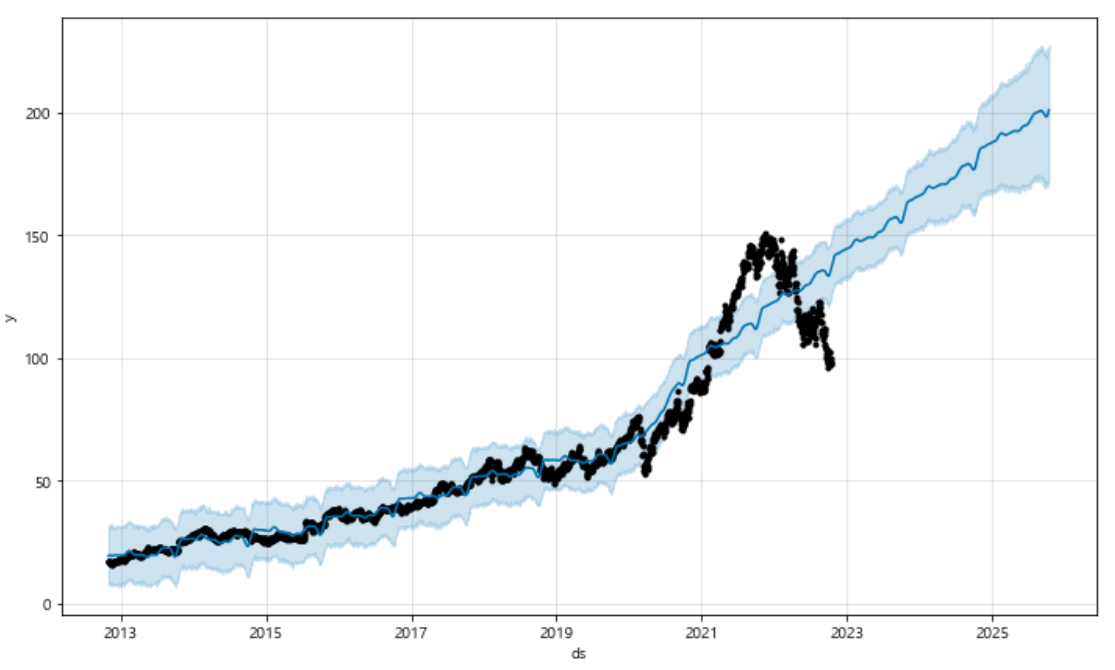
시각화
model.plot(forecast)
model.plot_components(forecast)


'인공지능 > 딥러닝' 카테고리의 다른 글
| [시계열분석] 주식데이터 주가예측 - ARIMA 모델 (잔차검증, 훈련 및 예측, 시각화) (0) | 2024.01.16 |
|---|---|
| [시계열 분석] 주식데이터 주가예측 - 주식흐름( 롤링rolling ), ARIMA 모델, AR(자기상관), MA(이동평균), 정상성/비정상성(차분), ADF 테스트(adfuller), ACF plot/PACF plot, ndiffs/auto_arima 함수 (4) | 2024.01.15 |
| [YOLO] 이미지 증식 테스트 + 사람이미지 증식 및 4차원 독립변수와 종속변수(라벨링) 생성하기 + (응용)비프음 출력 (41) | 2024.01.11 |
| [YOLO] YOLO 카메라 객체탐지 (2) | 2024.01.11 |
| [YOLO] YOLO 설치 및 객체탐지 Image사용 (1) | 2024.01.10 |