기본적인 JavaScript를 이용해서 자동차가 전진, 좌회전, 우회전하는 코드를 짰다.
탱크 언어 코드를 이용해서 자동차의 움직임을 표현해보았다.
움직임이 잘 보이게 하기 위해서 뒤에 격자 무늬를 넣었다.
1. 전진, 좌회전, 우회전 로직 만들기(javascript)
2. 탱크 언어 코드 입력 ( code = "11 11 11 01 11 11 01 11 10 11")
3. 격자 무늬 배경 넣기 (css)
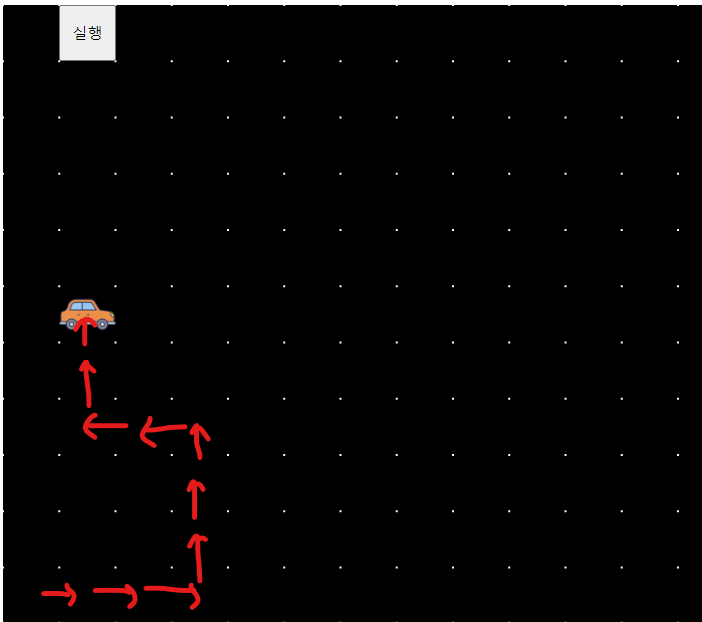
4. 실행
1. 전진, 좌회전, 우회전 로직 만들기
<script>
        function executeTankCode() {
            const tankElement = document.getElementById('tank');
            const tankImage = tankElement.querySelector('img');
            const tank = { x: 0, y: 500, direction: 'right' };

            const code = "11 11 11 01 11 11 01 11 10 11"; // 여기에 탱크 언어 코드를 입력하세요.

            const commands = code.split(' ');
            for (const command of commands) {
                if (command === "11") {
                    moveForward(tank, tankImage);
                } else if (command === "01") {
                    turnLeft(tank, tankImage);
                } else if (command === "10") {
                    turnRight(tank, tankImage);
                }
            }

            // 결과를 화면에 표시 또는 시뮬레이션할 수 있습니다.
            console.log(`최종 위치: (${tank.x}, ${tank.y}), 방향: ${tank.direction}`);
        }

        function moveForward(tank, tankImage) {
            // 직진 로직을 구현
            if (tank.direction === 'up') {
                tank.y -= 50;
            } else if (tank.direction === 'down') {
                tank.y += 50;
            } else if (tank.direction === 'left') {
                tank.x -= 50;
            } else if (tank.direction === 'right') {
                tank.x += 50;
            }
            // 이미지 위치 업데이트
            tankImage.style.top = tank.y + 'px';
            tankImage.style.left = tank.x + 'px';
        }

        function turnLeft(tank, tankImage) {
            // 좌회전 로직을 구현(반시계방향)
            if (tank.direction === 'up') {
                tank.direction = 'left';
                tank.x -= 50;
            } else if (tank.direction === 'left') {
                tank.direction = 'down';
                tank.y += 50;
            } else if (tank.direction === 'down') {
                tank.direction = 'right';
                tank.x += 50;
            } else if (tank.direction === 'right') {
                tank.direction = 'up';
                tank.y -= 50;
            }
            // 이미지 위치 업데이트
            tankImage.style.top = tank.y + 'px';
            tankImage.style.left = tank.x + 'px';
        }

        function turnRight(tank, tankImage) {
            // 우회전 로직을 구현(시계방향)
            if (tank.direction === 'up') {
                tank.direction = 'right';
                tank.x += 50;
            } else if (tank.direction === 'right') {
                tank.direction = 'down';
                tank.y += 50;
            } else if (tank.direction === 'down') {
                tank.direction = 'left';
                tank.x -= 50;
            } else if (tank.direction === 'left') {
                tank.direction = 'up';
                tank.y -= 50;
            }
            // 이미지 위치 업데이트
            tankImage.style.top = tank.y + 'px';
            tankImage.style.left = tank.x + 'px';
        }

    </script>
2. 탱크 언어 코드 입력 ( code = "11 11 11 01 11 11 01 11 10 11")
; → → → ↑ (좌회전) ↑ ↑ ←(좌회전) ← ↑(우회전) ↑
3. 격자 무늬 배경 넣기 (css)
<style>
        .grid-container {
            display: grid;
            grid-template-columns: repeat(11, 50px);
            /* 11개의 열, 각 열은 50px 너비 */
            grid-template-rows: repeat(11, 50px);
            /* 11개의 행, 각 행은 50px 높이 */
            background-image: linear-gradient(0deg, transparent 1px, #000 1px, #000 49px, transparent 49px),
                linear-gradient(90deg, transparent 1px, #000 1px, #000 49px, transparent 49px);
            background-size: 50px 50px;
        }

        #tank {
            grid-column: 1;
            /* 탱크의 초기 열 위치 */
            grid-row: 1;
            /* 탱크의 초기 행 위치 */
        }
</style>
<body>
	<div class="grid-container">
        <div id="tank" style="position: relative;">
            <img src="/iconcar.png" style="width: 50px; height: 50px; position: absolute; top: 500px; left: 0;">
        </div>
        <button onclick="executeTankCode()" style="position: relative;">실행</button>
	</div>
</body>
4. 실행


728x90
'Front-End > JavaScript' 카테고리의 다른 글
| [JavaScript]키보드로 움직이는 자동차 만들기 (1) | 2023.11.01 |
|---|